Author Topic: Rigid Paughco Rubbermount Sportster Frame Build  (Read 39402 times)

0 Members and 1 Guest are viewing this topic.

stevecrout

  • Club Member
  • *****
  • Posts: 345
    • View Profile
Re: Rigid Paughco Rubbermount Sportster Frame Build
« Reply #15 on: January 21, 2015, 08:34:40 PM »
Dennis -  not sure what kind of room you have there but could you attach a quick connect hydraulic coupler in place of the fourth line? Not sure if you can get a line small enough in there but maybe worth a look?
Why be normal?

Kaw-meister

  • Guest
Re: Rigid Paughco Rubbermount Sportster Frame Build
« Reply #16 on: January 23, 2015, 10:40:18 PM »
"T" & a plug...should self-bleed the small amount of air as soon as tank has oil in it....not really enough volume of air to be concerned with.

Dennis

  • Club Member
  • *****
  • Posts: 1726
    • View Profile
Re: Rigid Paughco Rubbermount Sportster Frame Build
« Reply #17 on: January 29, 2015, 04:43:30 PM »
Last week I phoned a few recommended chrome platers.  I guess winter is their busy time, because I was told it would take at least a couple of months.  I can't wait that long.  I phoned Atomic (they are in Mission) and they said a couple of weeks.  They said they'd give a quote after looking at the parts.

I sent my two fender braces to them.

I just got off the phone with Atomic Plating.    They estimate ... $130 ... each.  OACH!!

I told him to go for it.  This is my first foray into having a chrome shop chrome something for me.  I guess I won't be chroming the big pannier holder/luggage rack. 

Peace & Grease, Dennis

fast1

  • Guest
Re: Rigid Paughco Rubbermount Sportster Frame Build
« Reply #18 on: January 30, 2015, 09:53:44 PM »
Like the old saying goes-"chrome don't get you home"....but it sure does look pretty! For future reference the more grinding sanding and polishing you do before you send it off the cheaper it is, in anticipation of the finished project..CHEERS!

Dennis

  • Club Member
  • *****
  • Posts: 1726
    • View Profile
Re: Rigid Paughco Rubbermount Sportster Frame Build
« Reply #19 on: January 31, 2015, 09:19:45 PM »
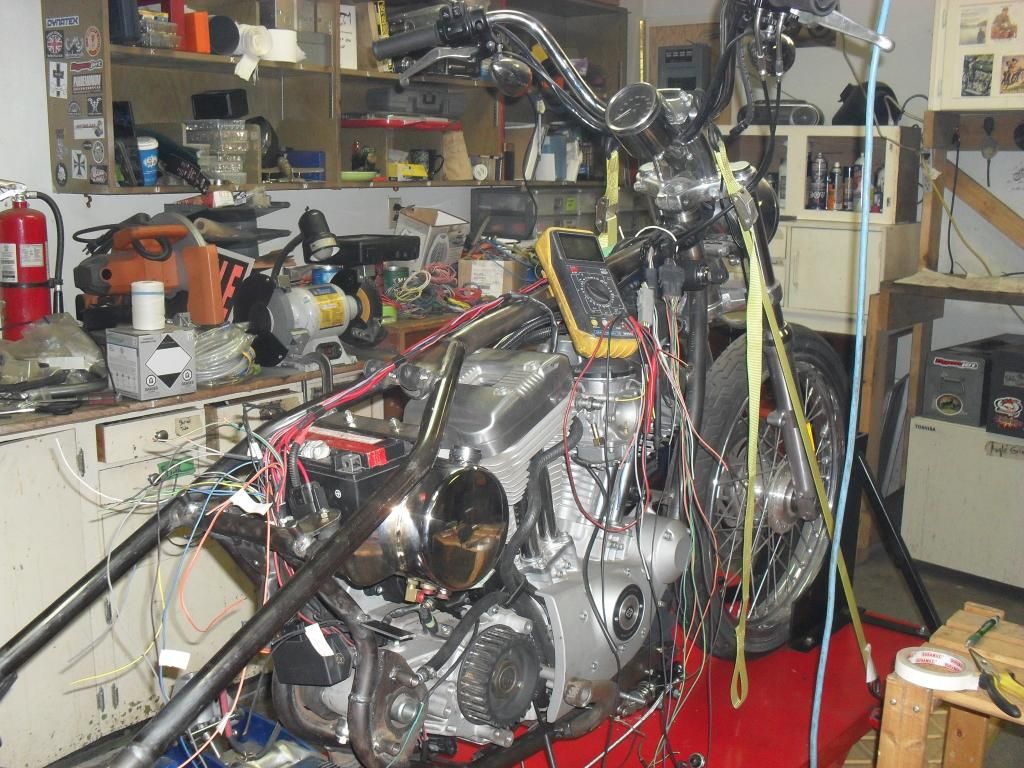
The wiring is coming along nicely.  The charging, starting, fuses, and ignition systems (include a bunch of sensors) are wired in.  The headlight is wired in.  Where these systems have handle bar controls or idiot lights, those are wired in too.  This is actually a "before" shot I took last weekend.


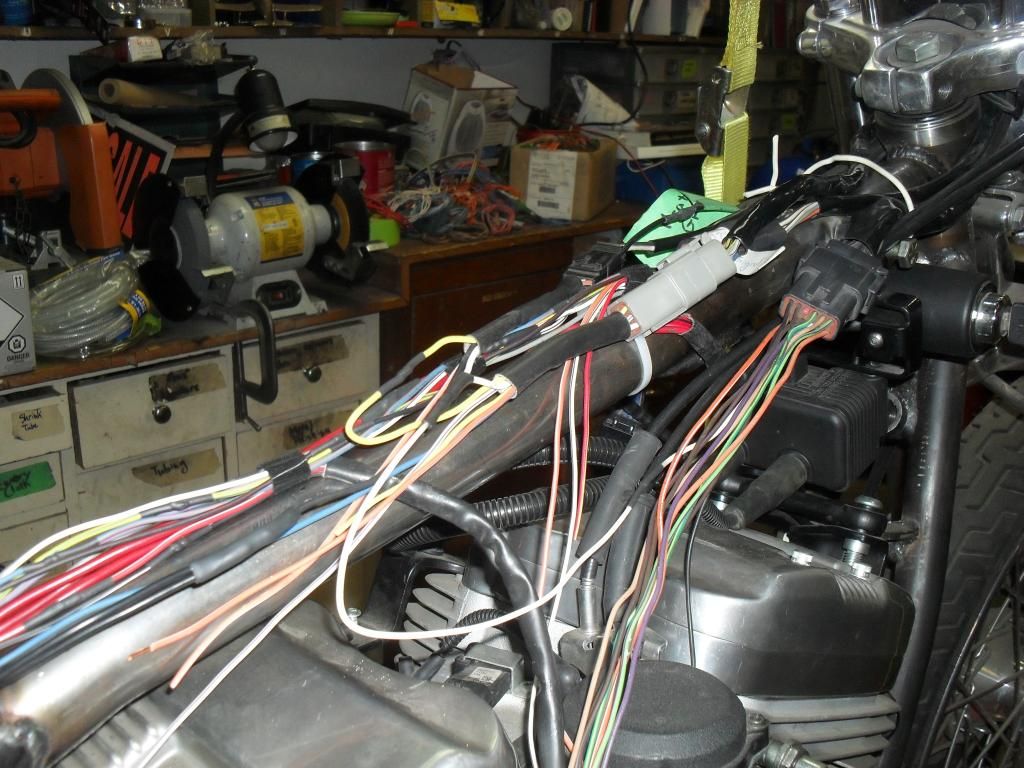
I had to call Ted for help with the hi/low beam wiring.  After a brief refresher course on Ohms Law, I confirmed I wired it correctly .

There will likely be quite a few of these "loops" (that's what I call them now), because I have removed the entire "anti-theft, don't lean too far, don't forget your signal light is on" safety module.  These loops are like by-pass surgery.

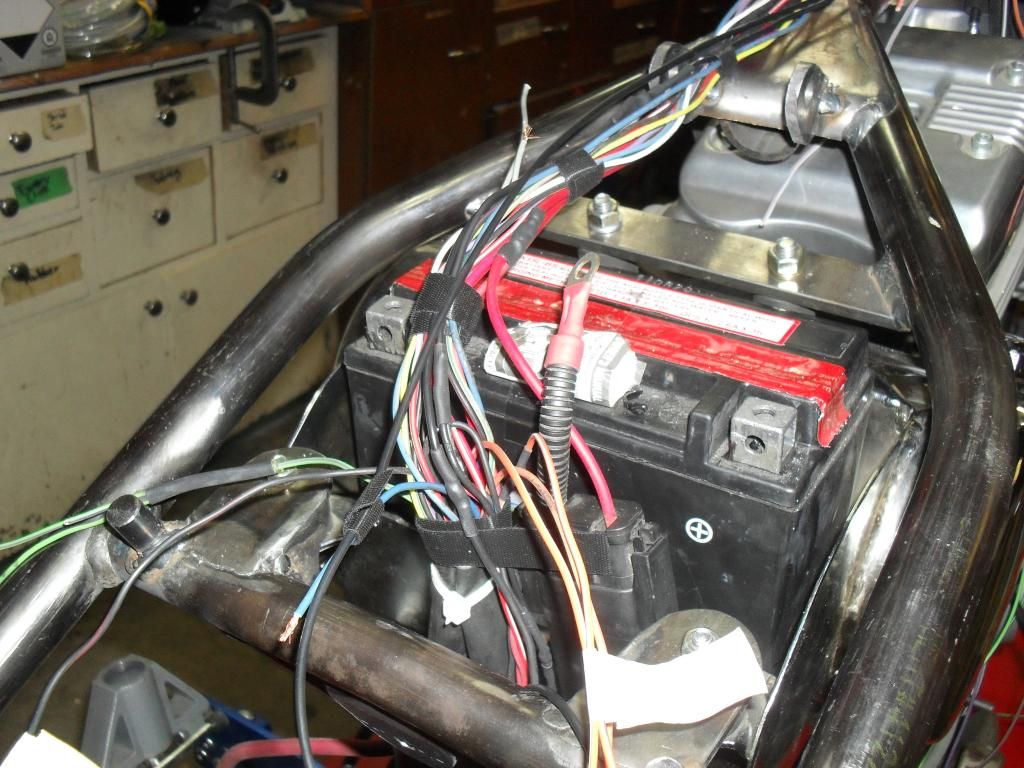
All block connections are the stock Harley items.  All inline connections were soldered with double walled shrink tube.


Peace & Grease, Dennis


« Last Edit: February 01, 2015, 03:03:21 PM by Dennis »

Dennis

  • Club Member
  • *****
  • Posts: 1726
    • View Profile
Re: Rigid Paughco Rubbermount Sportster Frame Build
« Reply #20 on: February 08, 2015, 03:36:42 PM »
Lots done.  I have working head light, tail light, signal lights, horn, and a whole schwack of idiot lights. 


The complete signal light system is designed to easily unplug and remove for when it will be in chopper mode.  In touring mode, the rear signal lights will be on the pannier rack ... yet to be fabricated.  There is no flasher or self cancelling idiot circuit.  The signals work the way Harleys did back in the 70's: your thumb and brain do the flashing.  I figure this is the safest set up.  I'll never ride down the rode forgetting my thumb is intermittently pressing a button.

The best part about getting the speedo wired in was I learned what the mileage was on my donor bike: 4803 Kms.   I wonder if it ever had its first oil change.

Peace & Grease, Dennis

Dennis

  • Club Member
  • *****
  • Posts: 1726
    • View Profile
Re: Rigid Paughco Rubbermount Sportster Frame Build
« Reply #21 on: February 10, 2015, 02:54:59 PM »
Done as much as I can do for awhile.

Jeff is fabricating an extended axle and spacers (the spacers go outside the frame and will double as the thrust point for the belt adjustors) onto which I can weld steel rod for the pannier rack.  When removing the pannier rack and going to chopper mode, the original axle and spacers will used.

I can't mount the tail light to the fender until I get my fender braces back from Atomic Plating; currently on route via Loomis.

I can't complete the rear brake switch until I get some new brake lines.  The ones I originally measured for are too long. I had planned a different route for the brake lines when I first measured; now I have a more direct route.    I need two because the rear brake switch is hydraulically operated and mounted on a T fitting.  Where the two lines meet the T is where the switch will go.  I just ordered from Excalibur some new lines which should put the T right where I want it.  However, until I have it in place, I am not going to solder in the wires.

I'm taking a couple weekends off for a vacation.

Peace & Grease, Dennis

Dennis

  • Club Member
  • *****
  • Posts: 1726
    • View Profile
Re: Rigid Paughco Rubbermount Sportster Frame Build
« Reply #22 on: February 12, 2015, 01:38:43 PM »
Ooooo .... Shiny

Got these back from Atomic Plating.  They are absolutely beautiful.  I hope they remain as robust as they are shiny.


Peace & Grease, Dennis

Qball

  • Club Member
  • *****
  • Posts: 324
    • View Profile
Re: Rigid Paughco Rubbermount Sportster Frame Build
« Reply #23 on: February 12, 2015, 02:39:16 PM »
lookin good denis
Keep your knees in the breeze and the rubber side down.
We ride  to wash the dust of daily life off our souls.

Dennis

  • Club Member
  • *****
  • Posts: 1726
    • View Profile
Re: Rigid Paughco Rubbermount Sportster Frame Build
« Reply #24 on: March 23, 2015, 09:45:02 AM »
Here's a photo of the extended axle and belt adjusters.


However, when I went to install the rear wheel, it was just ever so slightly too large in one spot.  Off to Jeff's for some fine tuning.


I could not get 1/2 inch rod on Saturday.  Princess Auto usually has it but it was all sold out.  I went to all the usual places with no luck.  I even snooped around fab shops where it looked like guys were working despite being closed.  Met some helpful guys on the Hart, all keen to help with a motorcycle, and none having any 1/2 inch rod.  I decided to just work on some mock up ideas with some 1/4 inch rod I had, to practice with my new rod bender.  The final version will look similar to the photo below, but with some more bends.


I will make sure I get some 1/2 inch rod during this week.  To be on schedule, I want to be able to start disassembling the bike for painting by the end of the month.   That'll leave two and a half months before the Father's Day Show 'n Shine.

Peace & Pressure, Dennis
« Last Edit: March 26, 2015, 12:40:51 PM by Dennis »

Donovan

  • Club Member
  • *****
  • Posts: 512
    • View Profile
Re: Rigid Paughco Rubbermount Sportster Frame Build
« Reply #25 on: March 23, 2015, 04:27:02 PM »
Excellent work Dennis.  Can't wait to see the finished product.

Dennis

  • Club Member
  • *****
  • Posts: 1726
    • View Profile
Re: Rigid Paughco Rubbermount Sportster Frame Build
« Reply #26 on: March 26, 2015, 12:38:32 PM »
Got some 1/2 inch rod.  These are one piece, symmetrically bent with my Princess Auto bender.  I welded them to the axel spacers.


Poor mock up with masking tape, and not where they'll probably end up.  Just for inspiration. 


My timeline goal now is to have the pannier mounts fabbed by Sunday evening.  Once they're done, the bike can be disassembled for paint and finish welds needed on the frame (places where I could not reach with the bike assembled).
Peace & Grease
Dennis

Dennis

  • Club Member
  • *****
  • Posts: 1726
    • View Profile
Re: Rigid Paughco Rubbermount Sportster Frame Build
« Reply #27 on: March 27, 2015, 05:16:48 PM »
Re: paint and decals, I started another thread under Painting, Custom Decals.

http://www.princegeorgevintagemcclub.org/forum/index.php?board=10.0

Peace & Grease, Dennis
« Last Edit: March 28, 2015, 03:55:15 PM by Dennis »

Dennis

  • Club Member
  • *****
  • Posts: 1726
    • View Profile
Re: Rigid Paughco Rubbermount Sportster Frame Build
« Reply #28 on: March 29, 2015, 10:18:16 PM »
Not quite on schedule, but I got a lot done. 


Need braces to complete the triangulation.  Brad suggested mounts that would just go under the seat springs.  I figure my fat ass will hold it in place.  The braces were fabbed as symetrical as I could get, by bolting them together while I filed and grinded.


Panniers are a little closer this time.  The brackets for the panniers and signal lights still need to be fabricated.


The stock signal lights will go where the divits are on the panniers ... that's the plan anyways.


Peace & Grease, Dennis
« Last Edit: March 29, 2015, 10:26:35 PM by Dennis »

british bulldog

  • Guest
Re: Rigid Paughco Rubbermount Sportster Frame Build
« Reply #29 on: March 31, 2015, 04:07:38 PM »
     
     Very nice Dennis. I think you are doing a awesome job in building this 8) bike. A lot of though, engineering, patience, great workmanship and a few beers, from what i can see is bring her to life. She will be sweet.

British Bulldog