Author Topic: Rigid Paughco Rubbermount Sportster Frame Build  (Read 39393 times)

0 Members and 1 Guest are viewing this topic.

Dennis

  • Club Member
  • *****
  • Posts: 1726
    • View Profile
Rigid Paughco Rubbermount Sportster Frame Build
« on: December 01, 2013, 06:31:48 PM »
I know its not "vintage" but since I am a long standing club member and forum contributor, I figured many of you have seen my 883 Sportster on my lift for the last couple years with progress at a snails pace.  This fall I had an epiphany moment when studying the wiring diagram, that I actually could figure it all out and probably even make it run.  I have been going at it with some seriousness for a couple months now, and am hoping to also complete this bike for riding season in 2014.  Not saying Father's Day ... just sometime in 2014.

Background:  I bought the engine, wheels, forks, brakes, wiring, tank and fenders, even a windshield and saddle bags; everything but the frame in a package deal for $1500. Its all from a 2004 Sportster 883 which was the first year the engines were rubbermounted.  Paughco introduced a rigid frame for the rubbermounted Sportster a few years ago, and I purchased one.  I have been all over the web and have not seen a completed one yet.  Hence the title to this thread; maybe I'll get some hits.

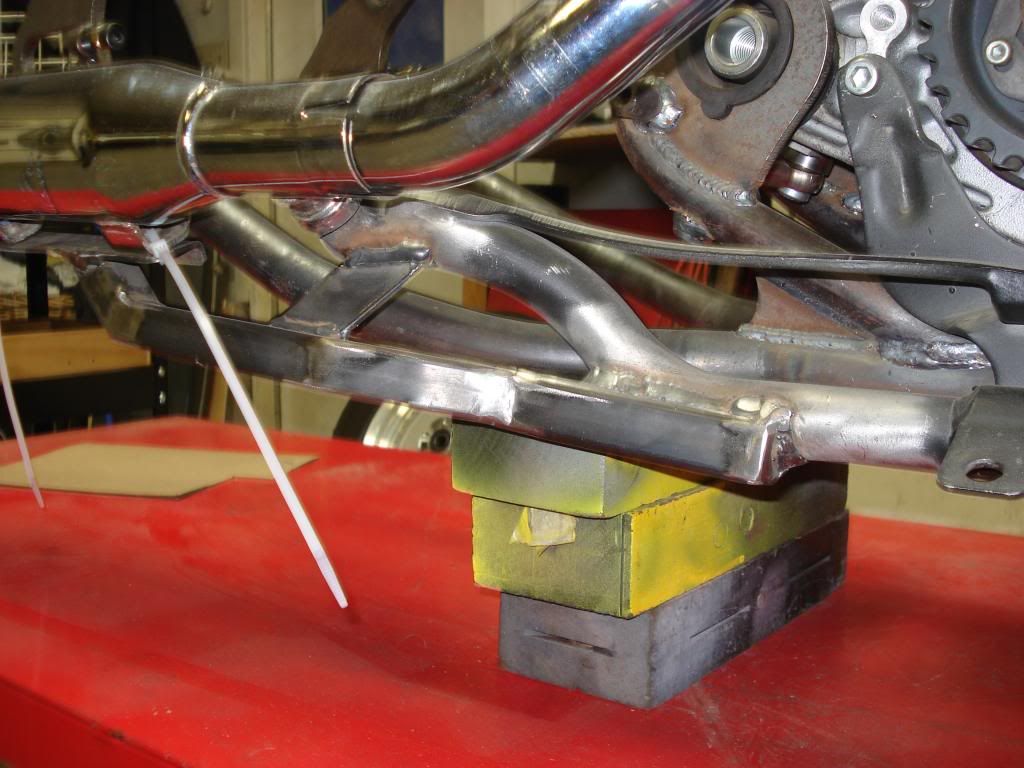
The first fab job was for the exhaust.  The rubbermounted engine is allowed to vibrate fore and aft,, but not side to side.  Because it moves, the exhaust has to be able to move with the engine.  This rules out mounting the exhaust to the frame.   The Paugcho rigid frame interferes with the stock exhaust mounting supports, so I had to cut, weld, cajole and otherwise modify it so that it would fit.  I think I did this two winters ago.


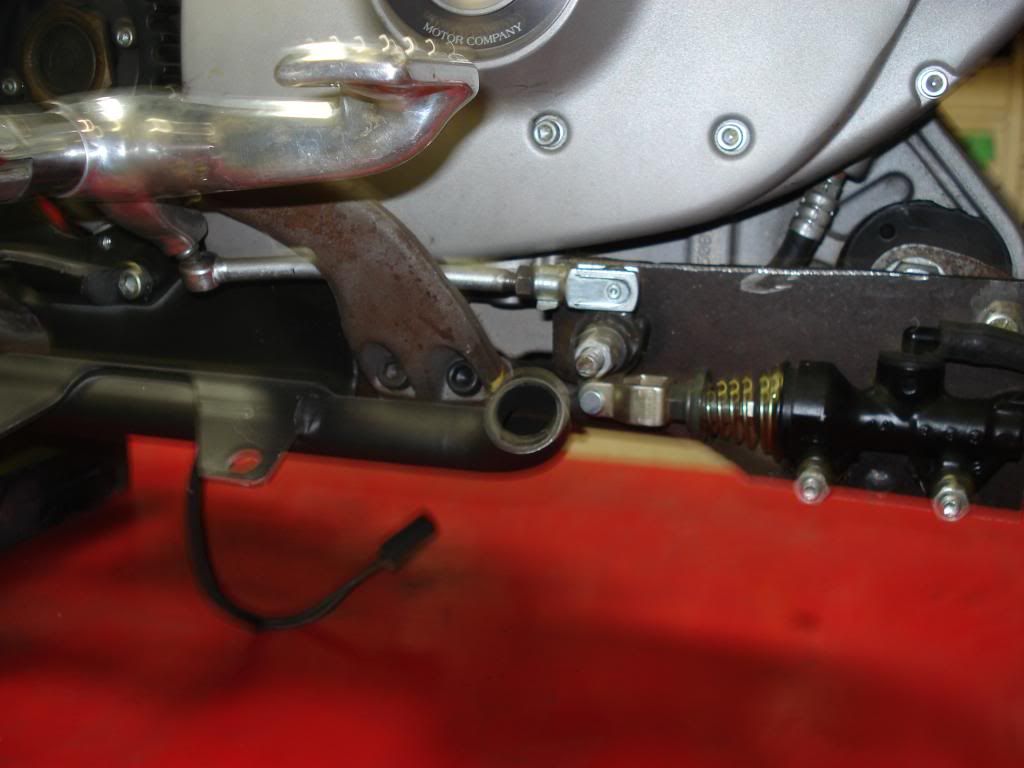
Last winter I was inspired only long enough to do the rear brake.  The brake on the stock 883 pushes the rod aft to the master cylinder.   There was no way that was going to work on this bike, so I fabbed up a mount for the master cylinder up front, and a linkage to make the rod push forward instead of aft.


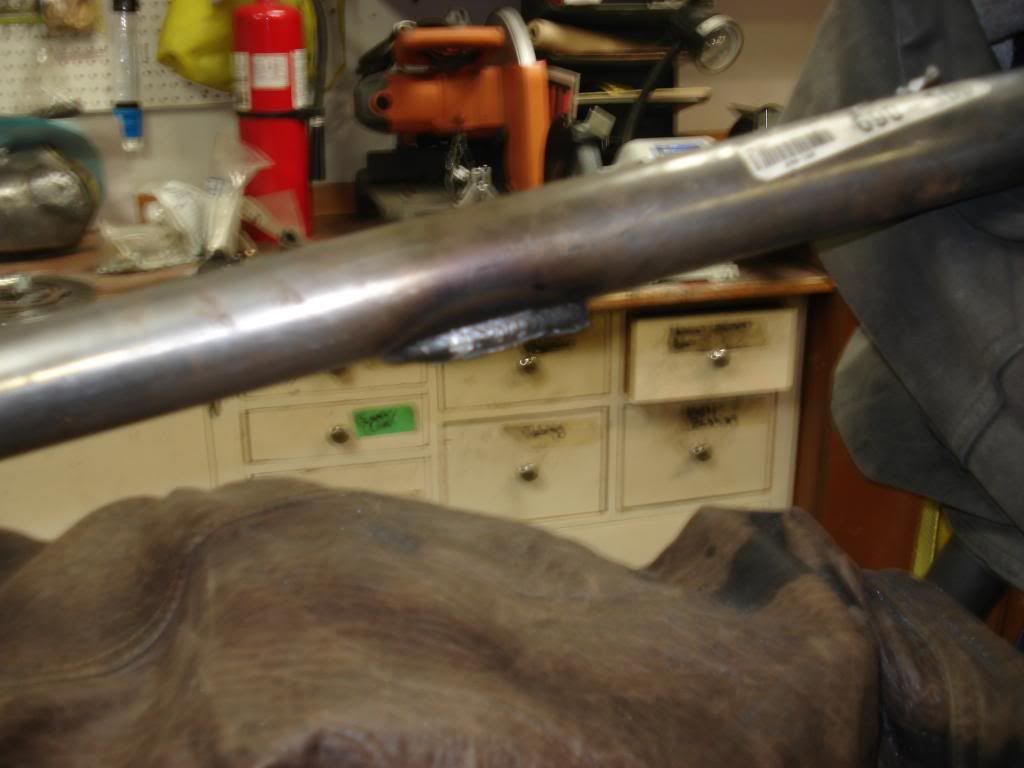
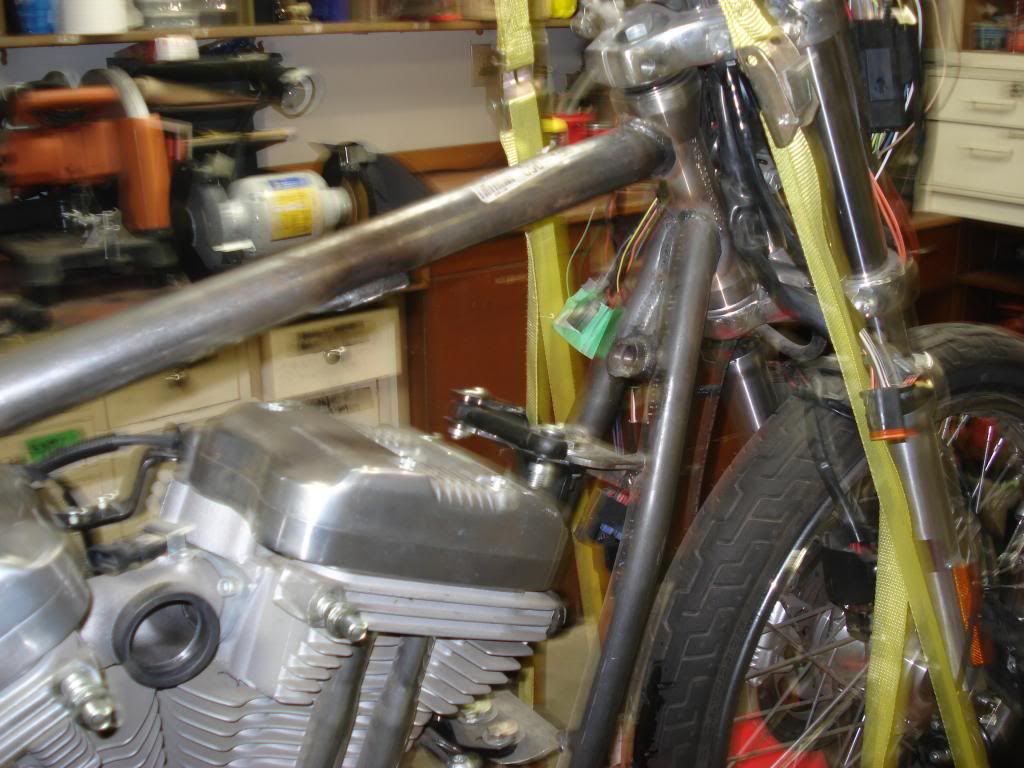
The next two photos are of a brace I cut out.  The brace  interfered with where I want to mount the coil and the ignition switch; I want them in close to the stock position.  My plan is to weld in a curved one after I have figured out where some of the other bits will get mounted.


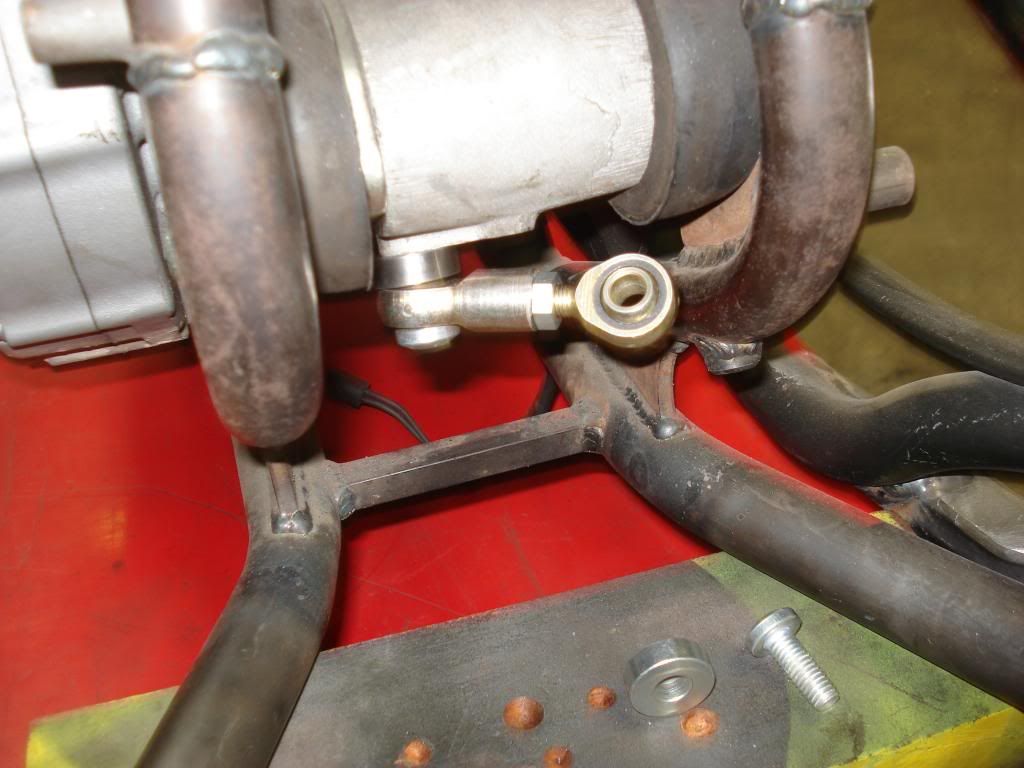
The rear motor mount was not well thought out by Paughco.  There is a small weldment with a threaded hole which I can only assume was supposed to be used for the rear mount, but it is not close enough or robust enough.  I plan to cut it out and make my own.  This is a photo of a male/female rod end I am trying to fit in.  Jeff machined the spacer seen in the photo.


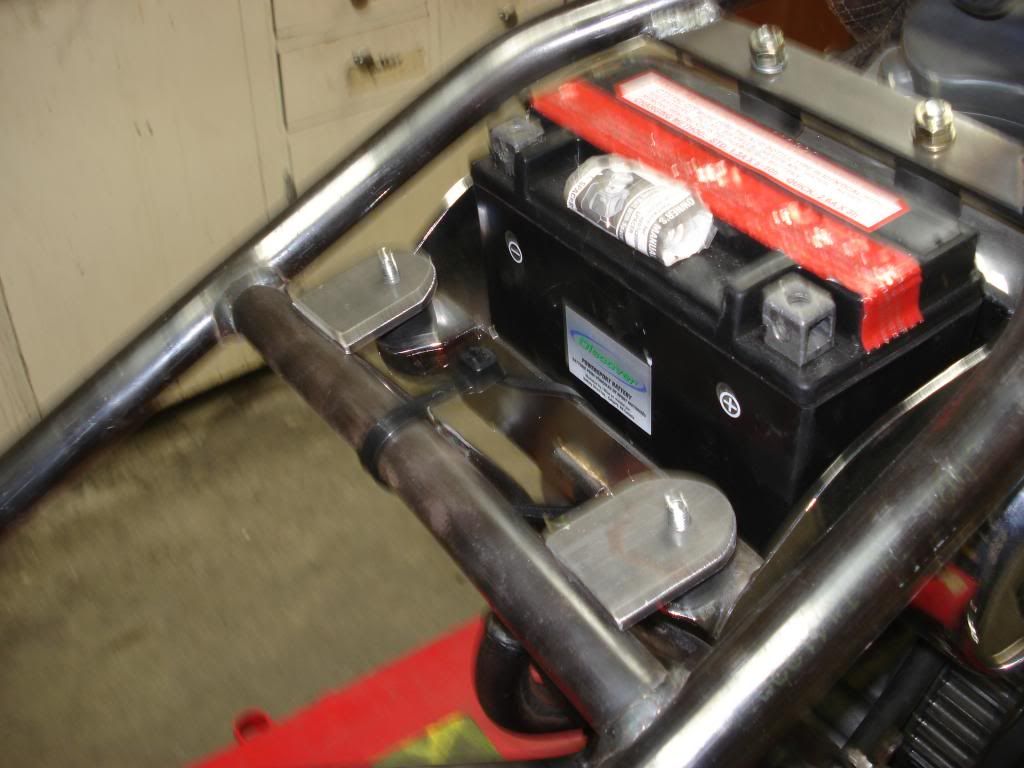
The oil tank was specified by Paughco for use with this frame and I bought it at the same time I bought the frame.  I also bought their "mounting kit."  The mounting kit is pretty because its chrome, but basically crap and the whole thing was pretty iffy.  I cut off the mounts on the frame, ditched the chrome mounting kit, and am fabricating my own.


Peace & Grease, Dennis
« Last Edit: December 02, 2013, 09:36:33 AM by Dennis »

Dennis

  • Club Member
  • *****
  • Posts: 1726
    • View Profile
Re: Rigid Paughco Rubbermount Sportster Frame Build
« Reply #1 on: December 09, 2013, 10:06:41 PM »
Finished the rear motormount.  With welding in hard to reach places, and with the engine still in the frame, set up was paramount.    I was only able to get one good safe access to do the weld.  Its going to be tack welded for now, and finish welded after the engine is out.  However, I also wanted to make sure that the weld wasn't so weak that it would get bent or knocked off when I disasseble. 

URL=http://s1219.photobucket.com/user/smith5304/media/8839Dec13007_zps5c14a8d2.jpg.html][/URL]


I welded up the oil tank mounts.


Mounted the rear brake resevoir.


I tried to get the stock belt gaurd to fit, but no matter what I did, it just looked ugly.  I had some leftover aluminum which is a perfect width.  However, I have to get it to the right shape.  Aluminum has a fair bit of spring back so I'm leaving this on until I have to take it off to get at something else.


Now I plan to spend some time on the Smithers XS650.

Peace & Grease, Dennis

Dennis

  • Club Member
  • *****
  • Posts: 1726
    • View Profile
Re: Rigid Paughco Rubbermount Sportster Frame Build
« Reply #2 on: December 23, 2013, 07:48:31 AM »
Lined up the holes for the gas tank mounts. 


The profile of the gas tank is okay.  However, up close the raised tank exposes a huge gaping cavern of a tank tunnel.  Russel says the problem is the yellow paint; if I paint the tank dark, the cavern will not be so noticeable.  I don't want to reposition the gas tank because I would have to move the petcock.  That is more fabrication than I want to take on at this point. 


Made my own battery cables.  I think they turned out well.


Peace & Grease, Dennis

Hortons Heroes

  • Guest
Re: Rigid Paughco Rubbermount Sportster Frame Build
« Reply #3 on: December 23, 2013, 09:08:47 PM »
great look

Dennis

  • Club Member
  • *****
  • Posts: 1726
    • View Profile
Re: Rigid Paughco Rubbermount Sportster Frame Build
« Reply #4 on: December 14, 2014, 06:34:23 PM »
After a couple weekends off, I got back to work this weekend.

I cut the fender to shape, and welded on a tab for the front mount.


I then fabricated the struts.  These are eventualy going to be chromed, so I spent most of the weekend filing them smooth.  I'll still have to sand them down even smoother before going to the chrome platers.


Nothing like a mock up to get inspired after a "couple weekends off."


Peace & Grease, Dennis
« Last Edit: December 14, 2014, 06:36:46 PM by Dennis »

Admin

  • Administrator
  • *****
  • Posts: 272
  • BMW K75S
    • View Profile
Re: Rigid Paughco Rubbermount Sportster Frame Build
« Reply #5 on: December 22, 2014, 04:08:25 PM »
As always I am astounded by the talent and skill sets shown by our members. Dennis's pictures just show some of the varied skills he has and the attention to detail.
Great work Dennis and the rest of the guys building and rebuilding bikes of all sorts.

Dennis

  • Club Member
  • *****
  • Posts: 1726
    • View Profile
Re: Rigid Paughco Rubbermount Sportster Frame Build
« Reply #6 on: December 22, 2014, 09:31:46 PM »
Spent most of Saturday making the mount for the ignition module.  First one was just bent steel, and was not up to snuff, so I started over.  One piece is welded to the frame and the other bolts to the ignition module. 


The reg/rec was much easier.


Peace & Grease, Dennis

fast1

  • Guest
Re: Rigid Paughco Rubbermount Sportster Frame Build
« Reply #7 on: December 23, 2014, 08:23:57 AM »
   fahers day show and shine??? Looking good! CHEERS.

Dennis

  • Club Member
  • *****
  • Posts: 1726
    • View Profile
Re: Rigid Paughco Rubbermount Sportster Frame Build
« Reply #8 on: December 23, 2014, 02:05:11 PM »
   fahers day show and shine??? Looking good! CHEERS.

Committing to the Father's Day Show 'n Shine has been a good motivator in the past, so I guess I'll toss down the gauntlet and say "you bet, this year's entrance will be the Rigid Paughco Rubbermount Sportster."

Geez ... now I feel pressured.  I guess I won't take as many "weekends off."

Peace & Grease, Dennis

madmac74

  • Guest
Re: Rigid Paughco Rubbermount Sportster Frame Build
« Reply #9 on: December 24, 2014, 04:27:22 PM »
 You always turn out something cool Dennis, don't worry.
 Merry Xmas

Parker & Twila

Dennis

  • Club Member
  • *****
  • Posts: 1726
    • View Profile
Re: Rigid Paughco Rubbermount Sportster Frame Build
« Reply #10 on: January 20, 2015, 05:35:04 PM »
I've misplaced my camera so I can't post any pictures right now.

I was planning on finishing the oil lines before I started in on the wiring.  I discovered a ... problem, and am inviting 2 cents worth from my brethren.

The Sportster is a dry sump system. The usual set up for dry sump is: an oil line from the tank to the pump (the "feed"), a line from the pump to the tank (the "return") and a line from the tank to the atmosphere (the "vent"). 

My aftermarket chrome oil tank has a fitting for each of these three lines.  So far so good.  The tank has a big opening for filling it.  However, there is no drain opening.  The stock 2004 Sportster has a fourth oil line from the tank with a screw in/out plug nicely located under the bike for draining the oil tank. 

There is no drain plug on the engine crankcase.

Query: suggestions?

The feed tube comes from the bottom of the tank (the return and vent go near the top).  I could put a tee in the feed tube and route a short tube with a plug under the bike.  That is sort of attractive, although I would always have to bleed it while filling to make sure there was no air which could interfere with the pump working.

Another idea I have is to just plumb it as is, and use an electric pump to suck out the oil from the tank through the filler opening.  Kinda sucks though (pun intended).

Peace & Grease, Dennis

Rusty Bucket

  • Guest
Re: Rigid Paughco Rubbermount Sportster Frame Build
« Reply #11 on: January 20, 2015, 07:11:23 PM »
Though hardly expert on this field - you know some experts, of course - I am convinced by both of your solutions, for my part.  Since the bike is filtering it's oil anyway, the cleaning of the tank would be more the occasional maintenance item, rather than every oil change, so merely draining the oil out with a pump or a syphon should be fine.  If, on the other hand, you added a T fitting to the vertical (more-or-less) supply run to the engine, opening the drain branch wouldn't have any effect on the pump, or on the oil in the line between the pump and the T fitting.  When the tank is refilled, air in the line between the tank and the T should rise to the top wth no problem, and gravity will naturally be pushing to supply the pressure pump.   So, either solution seems entirely workable. 
 
  On a 'touring' chopper, maybe the onus is on the builder to make 'on-road' maintenance as easy and fuss-free as possible, and that might suggest that the T-fitting on the supply line might be the way to go - no special tools beyond a pan for the oil.  Then again, on a touring chopper, maybe the focus might better be put on keeping things as simple and trouble-free as possible, and that might support a clean, one piece oil supply line to the engine, and a slightly more elaborate draining procedure, involving a syphon pump.  Either way seems perfectly supportable to me.

I would T the supply line, I think, if it was me, maybe right at the tank.  Guy might T the RETURN line, and divert the hot oil coming back to the tank into a pan - he is considering changing the transmission oil in his truck using a similar procedure...

fj1200

  • Forum Member
  • *
  • Posts: 536
    • View Profile
Re: Rigid Paughco Rubbermount Sportster Frame Build
« Reply #12 on: January 21, 2015, 01:41:58 PM »
I would go with the supply line as well.  With the return line, the bike would have to be running as the oil is being pumped out. Being as we are older and a bit more forgetful that doesn't seem like such a good idea.

Dennis

  • Club Member
  • *****
  • Posts: 1726
    • View Profile
Re: Rigid Paughco Rubbermount Sportster Frame Build
« Reply #13 on: January 21, 2015, 04:59:04 PM »
I would go with the supply line as well.  With the return line, the bike would have to be running as the oil is being pumped out. Being as we are older and a bit more forgetful that doesn't seem like such a good idea.

Hey Fj1200, are you still working at the Harley shop?  How about twisting some ears there for me?

I am leaning towards the tee in the feed line.  I will check my old stock oil tank and see if it still has the stock Harley tube and plug.   There is even a plastic do dad thing that clips the drain tube and plug to the frame so it is out of the way when not draining the tank.

Peace & Grease, Dennis

fj1200

  • Forum Member
  • *
  • Posts: 536
    • View Profile
Re: Rigid Paughco Rubbermount Sportster Frame Build
« Reply #14 on: January 21, 2015, 07:52:15 PM »
Sorry, they laid me off in July. Said they needed someone full time and not part time. Guess I'm not in tune with the "Harley" attitude / lifestyle.  I must admit to being amazed that anyone would pay 1000.00$ for a seat. So sorry can't help you.